Showing posts with label os x. Show all posts

5/01/2012

Brother MFC-465CN Color Inkjet All-in-One Printer with Networking Review

Brother MFC-465CN Color Inkjet All-in-One Printer with Networking
Average Reviews:

(More customer reviews)
I can't be happier about finally being able to take a sledge hammer to the festering pile of... err... that is, the HP PSC 1410 All-in-One Printer (Q7290A#ABA) I've been chained to for the past two years. This new Brother MFC-465CN is *everything* that the HP PSC 1410 is not -- it's quiet, it's fast, it's insanely easy to use, and (the single most important feature of all, in my opinion) it doesn't install hundreds of megabytes of useless bloat-ware and a dozen memory- and cycle-pig services on your computer when you install the printer driver.
I've got the MFC-465CN plugged into my LinkSys WRT54G wireless router, with wireless NIC's on five Windows boxes. It took me less than a minute per machine to install the driver, and (*gasp!*) it didn't add any services! Or tool tray garbage! Or auto-run garbage in the registry! My prayers had been answered! I wept for joy!
Regarding the other reviewer comment about slow printing, I have the feeling that your mileage may vary depending on how things are connected together. I just dumped this here page (lots of color, graphics, images, and whatnot) to the MFC-465CN and it took just a hair over 30 seconds from start to finish. Much, *much* faster than my old FrankenPrinter. And the print quality is *superb*, for both text and images. No idea how photos will look, but my bet is that it'll do an excellent job of it.
Also no clue about how long I'll be able to go before I have to replace the ink cartridges, but ANYTHING has to be better than the FrankenPrinter, which ate a black cartridge every three or four weeks... even though I rarely print more than a page every other day (!!!).
Just the mere thought of being able to nuke all of that HP bloat-ware on my computers and disembowel that PSC 1410 gives me great pleasure. And I think I'll jump up and down on its carcass a couple of times, and sprinkle some salt on it, just to make sure it doesn't rise from the dead.
UPDATED, 16JAN08: I've been working this printer like a plow-horse for the past month, churning out all sorts of stuff (maps, photos, mailing labels, etc.) and I *still* love the bejabbers outta it. I've dumped at least a dozen full-color Google maps, a dozen or so photos, around a hundred B&W pages and lots (and lots!) of mailing labels, and as far as I can tell it's NOT EVEN CLOSE to running out of ink -- black or otherwise.
Very happy camper. Loving this printer, and thinking about buying another one and putting it up in the attic, just in case they stop making 'em.

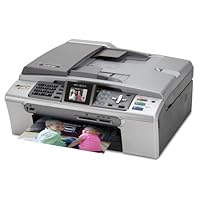
Click Here to see more reviews about: Brother MFC-465CN Color Inkjet All-in-One Printer with Networking

The MFC465cn includes a 2 color flip-up LCD display and a 4x6 photo bypass tray.Print rich, vibrant borderless photos with a droplet as small as 1.5 picoliters and True2Life technology. The MFC465cn can also do other tasks with built-in functions to scan, copy, fax/PC fax, and the PhotoCapture Center to print high quality color photos from digital camera media cards, PictBridge-enabled camera or USB Flash Drive. Print resolutions up to 6000 x 1200 dpi and color inkjet print speeds (30ppm in black and 25ppm in color).

Buy Now

Click here for more information about Brother MFC-465CN Color Inkjet All-in-One Printer with Networking

Read More...

2/04/2012

Cisco-Linksys PSUS4 PrintServer for USB with 4 Port Switch Review

Cisco-Linksys PSUS4 PrintServer for USB with 4 Port Switch
Average Reviews:

(More customer reviews)
Like a number of the other reviews mentioned, the PSUS4 works fine as a printserver but the included setup software isn't worth even removing from the box. I am by no means a networking expert but I had the time to tinker with the device and found that you really need to be ready to configure the PSUS4 directly using your browser and then configure each computer for local printing by creating a new TCP/IP port using the IP address of the unit and configuring it for printing to "USB1". If this sounds complicated it really isn't and with a bit of searching you can find quick and easy instructions from an article on the Linksys website (note the lack of mentioning USB1 in the article).
Long story short, don't buy this if you want plug and play but if you have a basic understanding of networking you will find this works fine after a bit of a painful initial setup. I found that it took much longer just to find the information I needed than actually setting up the unit.

Click Here to see more reviews about: Cisco-Linksys PSUS4 PrintServer for USB with 4 Port Switch

Share your USB printer and expand your network with one compact box The Linksys PrintServer for USB with 4-Port Switch is a double upgrade for your network. First, it lets you connect a USB printer directly to your network, eliminating the need to dedicate a PC to print serving chores. Using a PrintServer frees up your print share PC so you dont have to leave it on all the time. It also removes the printing bottleneck, and sets your PC free to do more useful work. In addition, the PrintServer includes a 4-port 10/100 switch, so you can easily add more devices to your network. All four ports are auto speed negotiating, and have automatic MDI/MDI-X crossover detection, so you dont have to worry about the cable type.

Buy Now

Click here for more information about Cisco-Linksys PSUS4 PrintServer for USB with 4 Port Switch

Read More...

1/15/2012

NETGEAR PS121 USB 2.0 Mini Print Server Review

NETGEAR PS121 USB 2.0 Mini Print Server
Average Reviews:

(More customer reviews)
The installation is a little challenging. However, after reading the "troubleshooting" section of the little instruction manual, it worked. Not sure about long-term reliability, as the unit seems to get very hot. Size-wise, perfect! No perceptible delay in spooling the printer. It does not make economic sense to buy a wireless print server, if the router and the printer remain stationary. This print server is great for my use, i.e. wireless Internet in one room, with remote printing in another. Will report back if any problems develop. Remember, be patient and keep trying all of the options during the installation. FOLLOW-UP: Worked fine for two months until my old Canon BJC-2100 printer died (of natural causes that I believe are unrelated to the print server). Upon trying to re-install the print server with a new Canon Pixma IP3000 printer, I once gain ran into installation challenges. This time the print server did not recognize the printer nor the network connection. The written instructions did nothing. However, after visiting Netgear's website, I followed the recommendation to disable my software firewall (PC Cillin 2005 in my case). Low and behold, everything is now working, and I am once again a satisfied Netgear user. Does exactly what it is supposed to do (allow remote prining or printer sharing), with minimal, if any delay in spooling. Bottom line: Good product, lousy instructions!
FURTHER UPDATE (September 15, 2007): Two years after purchase, the original PS121 (which I reviewed) started to act up, i.e. was periodically NOT recognizing my printer. After re-installing from the Netgear disc several times, I got tired and decided to "upgrade" to a PS121 with "version 2" software. Before doing this I had trouble finding another brand that would work. No go on D-Link (not compatible per website) and Air-Link (compatible but did not work for me!) Again, the Netgear install was a bit tricky, foiled initially by "Norton Antibot" program. Be sure to disable any and all antivirus, anti-spyware and firewall programs!!! The newer PS121 version runs a PS121v2 indicator in the system tray, which gives a "positive assurance" that the printer is recognized. The only time I get a red light (not connected) is when the printer is powered off. After two months, everything is working fine. I would still recommend this item, however, make sure you have the Version 2 (v2) model. CAUTION to all: Make sure you visit Netgear's website prior to purchase, to ensure compatibility with your operating system and specific printer. I can't understand why the printer manufacturers can't market their own print servers. This would certainly help with the "compatibility" issue. I don't think this works with VISTA OS. Another reviewer mentioned downloading drivers from Netgear's website. I have XP, so no issue here. If problems do develop, I will report back.

Click Here to see more reviews about: NETGEAR PS121 USB 2.0 Mini Print Server

The NETGEAR PS121 USB 2.0 Mini Print Server makes it easy for multiple users on a network to share a printer, letting you place the printer at a convenient spot for the entire office or out of the way altogether.
Easy Setup with USB 2.0 The PS121 works with most USB port printers from HP, Epson, Canon, Lexmark, and others, and it supports all major Windows operating systems.
Simply plug in the PS121 to your printer with the included USB cable on one end and connect it to your network via an Ethernet cord on the other. The print server features a 10 Mbps Ethernet connection for quick data transfer and an easy-to-use web-based management tool.
Save Time, Energy and Money Using the print server eliminates the need to have a dedicated PC always-on acting as a print server, thus conserving energy and saving money. The print server supports simultaneous print jobs and an on-board memory buffer keeps prints coming out quickly.
The NETGEAR PS121 USB 2.0 Mini Print Server is backed by a 1-year warranty.
What's in the Box PS121 USB Mini Print Server, resource CD, power adapter, 5-foot USB cable, installation guide, and warranty/support information card.

Buy Now

Click here for more information about NETGEAR PS121 USB 2.0 Mini Print Server

Read More...

1/10/2012

Apple Time Capsule MB276LL/A (AirPort Extreme Plus 500 GB Storage) Review

Apple Time Capsule MB276LL/A (AirPort Extreme Plus 500 GB Storage)
Average Reviews:

(More customer reviews)
I've been using Time Machine since I upgraded to Leopard. While Time Machine is great for backing up my iMac, its a pain to have to hook up my Mac Book Pro and new Mac Book Air to an external hard drive. The Time Capsule is great for that. So long as my laptop is open and running, a backup can happen.
Make sure you remember to do your first backup using ethernet. Otherwise it is going to be slow. Apple does not want to bog down your network with backups, so when you are backing up wirelessly, it will intentionally throttle the connection sped.
This device also functions as a wireless router. I was able to remove my previous Air Port Extreme from the network. The large size is nice because you are able to share one large drive and backup several smaller computers. My iMac and laptop all backup just fine.
The device does run a little hot. The Best Way to Backup a Mac Laptop

Click Here to see more reviews about: Apple Time Capsule MB276LL/A (AirPort Extreme Plus 500 GB Storage)

Introducing Time Capsule. Automatic wireless backup for your Mac. Time Capsule is a revolutionary backup device that works wirelessly with Time Machine in Mac OS X Leopard. It automatically backs up everything, so you no longer have to worry about losing your digital life. Time Capsule is also a full-featured 802.11n Wi-Fi base station. Every computer in your house can work off a wireless network at blazing speeds. And they can back up wirelessly to the same Time Capsule.

Buy Now

Click here for more information about Apple Time Capsule MB276LL/A (AirPort Extreme Plus 500 GB Storage)

Read More...

12/14/2011

Plugable USB 2.0 to 10/100 Fast Ethernet LAN Network RJ45 Adapter - Wii Compatible (Black) Review

Plugable USB 2.0 to 10/100 Fast Ethernet LAN Network RJ45 Adapter - Wii Compatible (Black)
Average Reviews:

(More customer reviews)
What I look for in most products is reliability. I only want to buy it once! This item works as advertised.
It's compatible with the two systems I tried so far; Windows7 and XP. And it's fast.
If your wondering how long the attached cable will last, it seems sturdy enough to see many years of normal use. This is a quality item. I doubt anyone buying this adapter will be disappointed. Enjoy!

Click Here to see more reviews about: Plugable USB 2.0 to 10/100 Fast Ethernet LAN Network RJ45 Adapter - Wii Compatible (Black)

Providing Fast Ethernet connectivity over USB, the Plugable USB 2.0 to 10/100 Network Adapter has a compact external design and wide compatibility with its ASIX AX88772A chipset.Two LEDsmontior power and link activity. Support for this adapter built in to Nintendo Wii (no driver required).Wired ethernet via this adapter provides faster and more reliable Netflix streaming, game downloads, and network access than the Wii's built-in wireless networking (up to 2-3x as fast). 32/64-bit drivers for Windows 7, Vista, XP, 2000, ME, and 98SE.Drivers for Mac OS X 10.4 and higher (latest OS X 10.6 may require manual IP configuration). Driver for Linux kernel 2.6.9+ (may require building kernel module). Included in package are the adapter, driver disk, and quick start guide. Visit plugable dot com for more information and tips for making the most of your Plugable USB 2.0 10/100 Network Adapter.

Buy NowGet 44% OFF

Click here for more information about Plugable USB 2.0 to 10/100 Fast Ethernet LAN Network RJ45 Adapter - Wii Compatible (Black)

Read More...

12/02/2011

Arkview USB 2.0 10/100 Ethernet USB 2.0 Print Server (1 Port) PC/MAC Review

Arkview USB 2.0 10/100 Ethernet USB 2.0 Print Server (1 Port) PC/MAC
Average Reviews:

(More customer reviews)
I read all the good an bad reviews on this topic. Basically, it seemed that if people had a popular printer it supported, they were very happy. If not, it didn't work and they were unhappy.
I went through the process of trying to make it work with an unsupported Lexmark Laser printer. The setup software could see the printer (through my wireless network and the printer USB port, it could see which model it was) But it didn't want to install.
About to give up, I pulled out my old AirLink APSUSB2 printer server instructions. The process worked, but I believe you will have to set up a fixed IP address to go through this process. Make sure the fixed ip is above your router allowed HTPS list of address, and that it is a trusted IP on your home router/firewall.
After you have configured a fixed IP through Arknet's "Networking USB Server setup software," you do these basic steps for Windows XP:
In "Printers and Faxes" window, select Add Printer. Click Next
In the local or network printer window, select local printer, but don't select "automatically detect and install....". Click Next
In "select a printer port" select create a new port. In the pulldown, select Standard TCP/IP port. Click Next
A Standard TCP/IP port wizard comes up. Click next
In the "Add Port" window, Enter the IP address you have set the server to as discussed above, for example 192.168.150.254
Put in a port name. I overrode what defaulted tere and used port1. Click next
Under the "Additional Port Information Required" window, select the "custom" choice and hit settings
In the "port Settings" box brought up, leave the port and ip as is, change the radial button from "raw" to "lpr", and put your port name (port1) in the Queue name entry box. Select OK
You will be be brought back to the additional port information reqd screen. Hit next. Then Click Finish, to finish the port wizard.
Next, you will get the install printer software window. Hopefully you printer is already there and available through Windows XP (mine was). Otherwise you might have to access some driver files. Click next
I the "use existing driver" box, I selected existing driver and clicked next.
Under name your printer, you can change the name and choose whether you want it to be the default printer. Next
Then you can print a test page, and complete the installation. If the test page doesn't work, try it one more time after the installation completes.
I have little/no experience with later windows products, and so don't know if all these steps are easily doable in these products.
But it worked on XP and surprised me when it did. Thanks, Airlink, for providing the instructions for this workaround that Arkview didn't.


Click Here to see more reviews about: Arkview USB 2.0 10/100 Ethernet USB 2.0 Print Server (1 Port) PC/MAC

Arkview-Feets palm sized 1-port USB 2.0 Print Server allows any networked computer to share a USB printer. It complies with USB 2.0 specifications (backward compatible with USB 1.1 spec.), and provides users with an auto-sensing Ethernet port that works with either 10Base-T or 100Base-T networks. This unit also supports multiple protocols and multiple operating systems, ; ; The built-in web management feature provides more convenience by allowing the user to configure, monitor and even reset the print server via a web browser. This eliminates the need to place the printer right next to the computer. Print jobs can be sent to a printer in the same office. ; ; Features; Easily connect your USB printer to a network; Allows multiple computers to share one USB printer on the network; Print from any computer on your network; Supports DHCP Client and multiple network protocols; 10Base-T / 100Base-T auto-sensing; Supports Telnet and Web Management software; ; Specifications; Network Cable Length; 6 Feet; Network Protocol; IPX, TCP/IP, NETBUEI, APPLETALK, LPR, smb (Over IP); Cable Type; CAT5; Network Interface; 10/100Mbps RJ45; Printer Connection; USB 2.0, USB 1.1; Standards; IEEE 802.3 10Base-T; IEEE 802.3u 100Base-T; USB 2.0; Management; Web Based-UI, Networking USB Utility; ; Requirements; Windows 2000/XP/2003/Vista; Mac OS X; Printer with USB connection; Printers:; ; Most printers with USB connections are supported; Network environment:; ; 802.11b/b or 802.11n Wireless networks; 10/100Mbps networks; ; Package Content; 1 x 1-Port USB 2.0 Print Server; 1 x CAT5 Patch Cable; 1 x Power Adapter ; 1 x Installation CD; 1 x User Manual;

Buy Now

Click here for more information about Arkview USB 2.0 10/100 Ethernet USB 2.0 Print Server (1 Port) PC/MAC

Read More...

12/01/2011

Buffalo Technology Network USB 2.0 Print Server LPV3-U2 Review

Buffalo Technology Network USB 2.0 Print Server LPV3-U2
Average Reviews:

(More customer reviews)
Although I've never heard of Buffalo Technology before (http://www.buffalotech.com) I decided to purchase this product because there was at least some confirmation from others that it would work with Apple OS X. Linksys was my first choice but they don't claim any Mac support at all for their PSUS4 server so I gave up on them.
Anyway when this product arrived I was determined to install it using only my Mac and not resorting to one of my Windows systems because it seemed that most people were having difficulties on the Mac side. The manual section for Mac is completely wrong, so ignore it. Here's what I did:
1. Unpack, plug in to printer, network and lastly plug in the power.
2. I have a DHCP server in my network router which for me means devices get assigned IP addresses from a pool starting with 192.168.0.xxx. Go to your router configuration web page and find the address of the print server device. If you don't have a DHCP server the device will be at IP address 192.168.11.222 according to the manual.
3. Bring up Safari and type in the address, e.g. http://192.168.0.123. It will ask you for a username/password. The username is 'root' and the password is empty by default. If you see the printer configuration page then you have confirmed the device is working. You can come back to this page to mess with settings if you know what you are doing.
4. Go to System Preferences, click on Print & Fax. Click on '+'. I'm running OS X Leopard which shows a window with a toolbar with a Default button on the left. You should see 'P1' in the list of printers.
5. Ignore the default setting for 'Print Using' and look for the closest match to your printer in the list of Gutenprint drivers. I have a Canon PIXMA iP3500, so I selected 'Canon PIXMA iP3100'
6. Close the Preferences windows and open TextEdit. Type something in an select File Print... and press Print. You should see the Print Queue window and after a few seconds you should see your document print.
Piece of cake! On the Windows side of things don't bother installing the supplied software. It just confuses things. Unlike the Mac installation you couldn't do the Windows one without consulting the manual. Sadly, Windows has became a torturous maze of dialog boxes. Ready? On Windows XP do the following:
1. Go to Control Panel, Printers and Faxes, Add Printer... then click Next
2. Select Local Printer (don't ask) and uncheck the 'Automatically detect (blah)' option
3. Select 'Create New Port', then 'Standard TCP/IP Port'.
4. Next wizard... Type in the IP address from above, and then type over the printer port/name that got unhelpfully filled in for you (remember it is P1 by default)
5. On the next page select 'Generic Network Card'. Yes, I was shaking my head at this point too.
6. After clicking OK on the next very big message box, and a brief intermission, select your printer driver.
7. Print a test page and if all is well you should be up and running.
Despite the nuttiness of the operating systems this is a great device. I hope the company comes through it's current legal troubles and continues to produce great products like this.

Click Here to see more reviews about: Buffalo Technology Network USB 2.0 Print Server LPV3-U2

MODEL- LPV3-U2VENDOR- BUFFALO TECHNOLOGY FEATURES- Network USB 2.0 Print Server Compatible with any USB-enabled printer the Buffalo Network USB 2.0 Print Server offers a simple solution for adding a printer to your network. You can save valuable time space and resources by easily accessing your printer attached anywhere on your 10/100 network. Easy installation via web browser Internet Printing Protocol support and the remote management utility allow you to control and print your jobs from anywhere. Increase your productivity andmaximize your performance with this easy to use and operate print server. * Share USB Printer with Everyone on a Network* Simple and Quick Installation* Print Out Files and Pictures Remotely * Manage Through Web Browser or Using Software Tool* Works with Most OSs Web Browser Configuration (Please check with the printer manufacturer to ensure they provide the drivers that support network printing).* Easy Setting with Utility Software or WEB Setting* Supports USB 2.0 and 1.1* Supports 10/100 Network* Auto-Negotiation and LAN Port* Supports IPP (Internet Printing Protocol)* Supports TCP/IP NetBEUI Rendezvous -SPECIFICATIONs INTERFACE - USB 2.0 and USB 1.1 IEEE802.3u (100 Base-TX) IEEE802.3 (10 Base-T)CONNECTORs - (1) RJ-45 port (1) USB 2.0/1.1 port (Type A)TRANSMISSION ENCODING METHOD-100BaseTX: 4B5B MLT-3 10BaseT: Manchester CodingACCESS METHOD- CSMA/CDPOWER- 5.0 volt 500 mA ConsumptionSIZE - 3.7" x 1.1" x 2.6" WT.- 3.2 oz.

Buy NowGet 4% OFF

Click here for more information about Buffalo Technology Network USB 2.0 Print Server LPV3-U2

Read More...

10/03/2011

Virgin Mobile Broadband2Go Wireless USB Adapter - Black (VMMC76NTKIT160) Review

Virgin Mobile Broadband2Go Wireless USB Adapter - Black (VMMC76NTKIT160)
Average Reviews:

(More customer reviews)
This device is a very fast (Sprint Network) and economical way to get onto the mobile internet without having to get locked into an expensive contract. Make sure you check your account each month that you use it though. I caught them skimming MB off my account. When I contacted them on it, they gave me a $10 credit to cover what they had taken from me, but made no apologies for it occurring. If you opt for this type of service, I strongly recommend that you add your usage history to your "remaining MB" a few times a month to ensure you are getting what you pay for. The month I caught them, I had used 138 MB in my history and they showed me having 98 remaining for a total of 236 vice the 300 I had paid for. It took three e-mails, and over an hour on the phone with a "technician" to get a $10 credit out of them to make up for it. Not the sort of thing that would happen with Verizon or another first tier carrier.
Now that they have gone to an "Unlimited Plan" at $40 a month, I am upgrading this to 5 stars. You can't beat the deal on this and my previous customer service issue is negated with this new pricing tier.
$40 a month for unlimited internet, and the ability to turn it off during the months that you don't use it, is a great deal. Because of my overall positive experience with this company, despite the problem I mentioned above, I have switched both our cell phones and our mobile data to them. I now pay $90 a month ($25 + $25 + $40) for what would cost $200+ a month from VZ or ATT.

Click Here to see more reviews about: Virgin Mobile Broadband2Go Wireless USB Adapter - Black (VMMC76NTKIT160)


Wireless USB card: Allows your laptop to connect to the Internet so you can surf the Web, check e-mail, download files and more wherever you go.
EVDO Rev A technology: For high-speed data transfer rates.
Built-in usage meter: Allows you to see how many megabytes you have left in your Broadband2Go plan (Broadband2Go plan required, not included; additional fees may apply).
Operates as a flash drive: With a microSDHC card reader (microSDHC media card not included).
Plug-and-play installation: For convenient operation.
Novatel Wireless software included: For expanded functionality.
Requires Virgin Mobile top-up card (not included): For full operation of the broadband card.

Buy NowGet 42% OFF

Click here for more information about Virgin Mobile Broadband2Go Wireless USB Adapter - Black (VMMC76NTKIT160)

Read More...

9/10/2011

D-Link DCS-920 Wireless-G Internet Camera Review

D-Link DCS-920 Wireless-G Internet Camera
Average Reviews:

(More customer reviews)
I bought DCS910 in Nov.2008 and DCS920 one month later. I am quite satisfied with both of them and I did not meet any problem till now, or say I could solve the problems that I have found.
The network attached camera supports up to 640x480 in resolution. It is higher then lots of other network attached camera which has only 320x240. So the image quality is quite good. It has good vision in dim light. you could see image or video on your web browser. It supports both MS ActiveX and Sun Java for live video monitoring but it does NOT support sound :(
You may need to install ActiveX control plug-in and Sun Java plug-in for your browser to support live video.
The supplied DViewCam software also supports monitoring up to 32 cameras and you could record videos into computer hard disk. I have not used video record feture till now because it requires turning on computer and consumes too much router/switch band width. I think check from web from time to time is good enough for my needs.
It support user account management, NTP time sync, DDNS name service, FTP and email deliver of photos at the frequency you defined.
The device does not support SSL protocol, so your password could not be encrypted for delivery. So you could not use https or ftps for secured communication. But this is understandable because encryption cost too much resources for the embeded system. You could not expect too much from tiny embeded device. Anyway, normal web access and FTP upload are good enough if you do not have too much security concern.
It is quite simple to access the device from within the internal/home network because you PC and the camera are in the same network segment. But if you want to access the device from external/Internet, there are some other things to take care. You need to have some basic networking concept for the setup.
I have seen one user complain the tech support and blame the device to be not usable. I could understand the mensioned situation. It is not the user's fault nor the product's fault. Tech support is not wrong on what they said but they should explain clearly on the technical background and guide the user for a smooth set up. User is not network expert so it will be a little difficult for them to understand and follow the network rules.
Normally, ISP will only give one dynamic IP address to a user. The IP address will change when you turn on the router or after a certain period of time. So you need to keep track to your current IP address on the WAN port of your router. This is usually done by register a DDNS service(free or paid service). Most router support DDNS auto update service and this camera also supports it but you need to set it up in your device. All the devices in your home network will share this single IP address. Network applications will monitor communication port for TCP/IP communication. Different devices in your network have different unique IP address. The IP address for a specific device is unique in the network. So if you want to access your camera through the internet in a remote location, you need to have DDNS service set; set up a internal static IP address to your camera; setup your router port forward to your camera IP address. For example, use http://dcs910.mydomainname.com:9011/ to access your camera, you need to buy(or register a free child domain name from some website) your domain name 'mydomainname.com'; register your domain name to a DDNS server(paid or free service); setup your router to auto update DDNS for your current IP address; set router to forward 9011 port request to the 80 port of the static internal IP address that you have assigned to your camera(such as 192.168.0.3 depends on the settings on your router and camera). You may need an experienced friend to help you for the setting.
Even if you have set everything correctly, it not necessarily means you could watch live video in your office. You should be able to access static current image from web browser in your office but live video is another story. Normally office network is protected by firewall on gateway. Most office firewall uses proxy and only open ports for web requests and some predefined application ports and bann all other communications. The ActiveX and Java live video of this device may need dedicated port connection to open communication session but this will not be allowed by default on the proxy. So unless you know your network administrator and could ask them open the port for you, you will not able to access live video in office. This is not the problem of the device, it is the rule of the network security. But anyway, you could see still image of your home which is good enough.
I have used my DCS910 and DCS920 for 3 months and I am quite satisfied with the device. I would like to highly recommand this device to you for its clear image, easy setup(if you understand networking in and out), and resonable price.

Click Here to see more reviews about: D-Link DCS-920 Wireless-G Internet Camera

The D-Link Wireless G Internet Camera (DCS-920) connects to an Ethernet or wireless network to enable remote high-quality video recording. 802.11g wireless technology allows you to place the DCS-920 in places that were previously inaccessible such as ceiling and walls. Support for the WPA and WPA2 standard ensures that you will be provided with the highest level of security when connecting to your wireless network.

Buy NowGet 24% OFF

Click here for more information about D-Link DCS-920 Wireless-G Internet Camera

Read More...